Comments
21 responses to “How to Draw an Eye”
-
This is the first video I’ve watched(last night); about 3/4 of the way through to get a feel for how i want to get started. Tonight I started my drawing. JASMINA, I love how you teach. Having been an instructor (different field) for many years , I sincerely appreciate the heart and love that comes through your work (play is a better word)!!
I found the only problem I had was using my compass…I kept lifting it off the paper so I used circle templates as an alternative.
Thank you for creating this program.
Robby-
Thank you so much 🙂 Glad you find the video useful. Please attach your work-in-progress images whenever you want.
-
-
How do i post my drawing
It’s not done yet. It seems your pencils are darker than mine even though I’m using same numbers. Also when i went to erase in the iris, my erase lines aren’t as clean as yours…is that technique (pressure) or equipment (eraser)?
Thank you-
Can you please attach your drawing to the comment box here?
-
-
I uploaded it ti PenPick
Is that correct? It doesn’t show up here -
I’m sorry
Didn’t know that was a separate area to join
Will join and upload-
You dont’t have to join separately to PenPick Graphite. You can use it as a member here at Pencil Drawing Tutor. The tool is available at no additional costs to you here: https://www.pencildrawingtutor.com/penpick-graphite/
-
-
I joined but have no idea how to get my drawing to you
It uploads to that penpick frame but then what? -
Might have it working –
Image Upload
-
wow, you are doing a great job. This looks very good. Shading is smooth and I love that you used the darkest values too. It gave the depth and life to the eye 🙂 Keep it up
-
-
I’m learning there is a logical progression with each step. My biggest hurdle will always be to take my time ….don’t rush…… Also, using the wrong paper can change the final sketch significantly.
-Larry
-
True. Patience is important. The shading is very good. It’s smooth and you haven’t smudged it. Great job! Which paper are you using?
-
This is the first time I used KMK Kent 200. It is fairly smooth and much whiter than the other papers I have.
-
Never heard of it. If you haven’t watched my videos on tools, just to let you know that I am using Fabriano Bristol. Very smooth, absolutely white, and thick paper. Canson Bristol is also good.
-
I just noticed something by adding light from my photography lighting in the range of 7,000 Kelvin. The graphite shows more of its true color and allow much better visibility while drawing. My ceiling light is an old halogen fixture that produces less than 3,000 Kelvin and more of a yellow tint. I think the difference is noticeable.


-
Yess, much better for showing online. I have a video about editing drawing; might be helpful, please watch it and let me know under that video: https://www.pencildrawingtutor.com/tutorials/how-to-photograph-and-edit-your-drawings/
-
-
-
-
Thanks again for all of your feedback.
Here is another eye with just random ideas thrown together with some of steps I learned in your tutorial. I grabbed a piece of paper by accident that was never intended for sketching.

-
This one also looks great 🙂 Keep it up
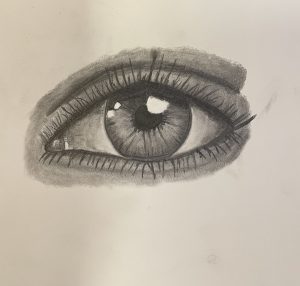
Here is my first time ever drawing an eye. I didn’t do the eyebrows yet, just wanted to first focus on the eye. The challenging part for me is the eyelashes, I just can’t get a nice flow with them on the pencil.
-
Looks very good. The shading is so smooth. The eyebrows are all same length, that’s what makes them unnatural. Try drawing longer ones and make them slightly curvy.
You must be logged in to post a comment.